When you have build your questionnaire its time to put it to the test. This article will explain how to put your questionnaire in Test mode and generate a testlink which you can use to check your questionnaire.
Table of contents:
General
After you have finished your questionnaire you want to test it before you publish it.
Click on the Test & Publish tab (1) to open page. Different modes are available for testing and publishing purposes.
You can switch back to your questionnaire by clicking on the Questionnaire tab (2).

The Queue and Live mode are for publishing the questionnaire.
Edit mode
After opening the test and publish tab for the first time your questionnaire will be in edit mode.
Because it has never been tested or published it will only show it in the edit mode.
The Edit mode reflects the questionnaire in you are currently editing in the questionnaire tab.
There are 2 sections in this mode an information section and a moving section to move or copy your questionnaire to the test, queue or publish mode.

The information section shows:
- The version number of questionnaire this will go up by one version every time you move or copy it
- The last modified by show the last user that edited the questionnaire
- The last modified on show the last date the current questionnaire in the questionnaire editor have been edited
If you are working with multiple collaborators on a project it very useful to know by who and when the questionnaire was last edited.
The moving section shows:
- The copy button which is used to copy your version to the test, queue or live mode
- The move button which is used to move your version to the test, queue or live mode
- The comment button which can be used to register a comment for this version
- The current version number of the questionnaire
The next section will explain how to put your questionnaire in the test mode.
Test mode
When you want to test your questionnaire you have to copy your current questionnaire version from the edit mode to the test mode. Click on the copy button (3) to open the popup.
The move button (4) is grey because you can only copy (3) a questionnaire from the edit mode.
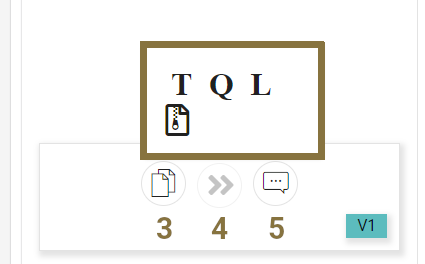
In the popup there are 4 options:
T: for test mode
Q: for queue mode
L: for live mode
Document picture: for Archive mode
Click on the T to copy your questionnaire to the testmode.
A popup will appear.

Click on yes.
The add comments popup will show.
Add a comment in the comment field and click on the add button to add it.
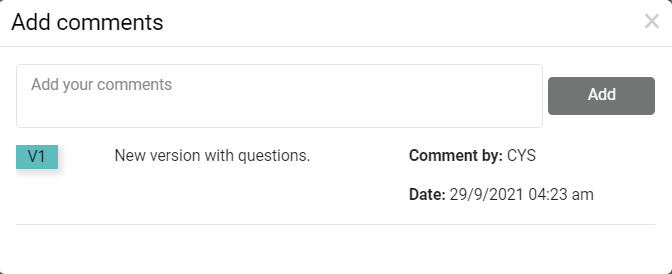
The comment is now added and is showing under the comment field with the version number of your questionnaire.
Note the changes you have done in your questionnaire to the comments to easily identify the changes in your questionnaire version.
Close the add comment windows and a refresh your project popup will show.

Click on the refresh button and your done.
You will receive a notification that a new project version is created.

The test mode wil now show the questionnaire version you copied to test.

The version number in the edit mode has gone one version up. If you make changes in the questionnaire editor you have to copy it again to test mode to see the changes.
The information section in the test mode shows:
- The version number of the questionnaire
- The last modified by user
- The last modified on date
- The testlink
- The date when test is published
Your questionnaire can now be tested by clicking on the Link button and will open in your browser.

After completing a test link a test record will be created in the database of your project. Which you can use to view your answers.