In this article we will provide you with a short tutorial on how to use email invite templates.
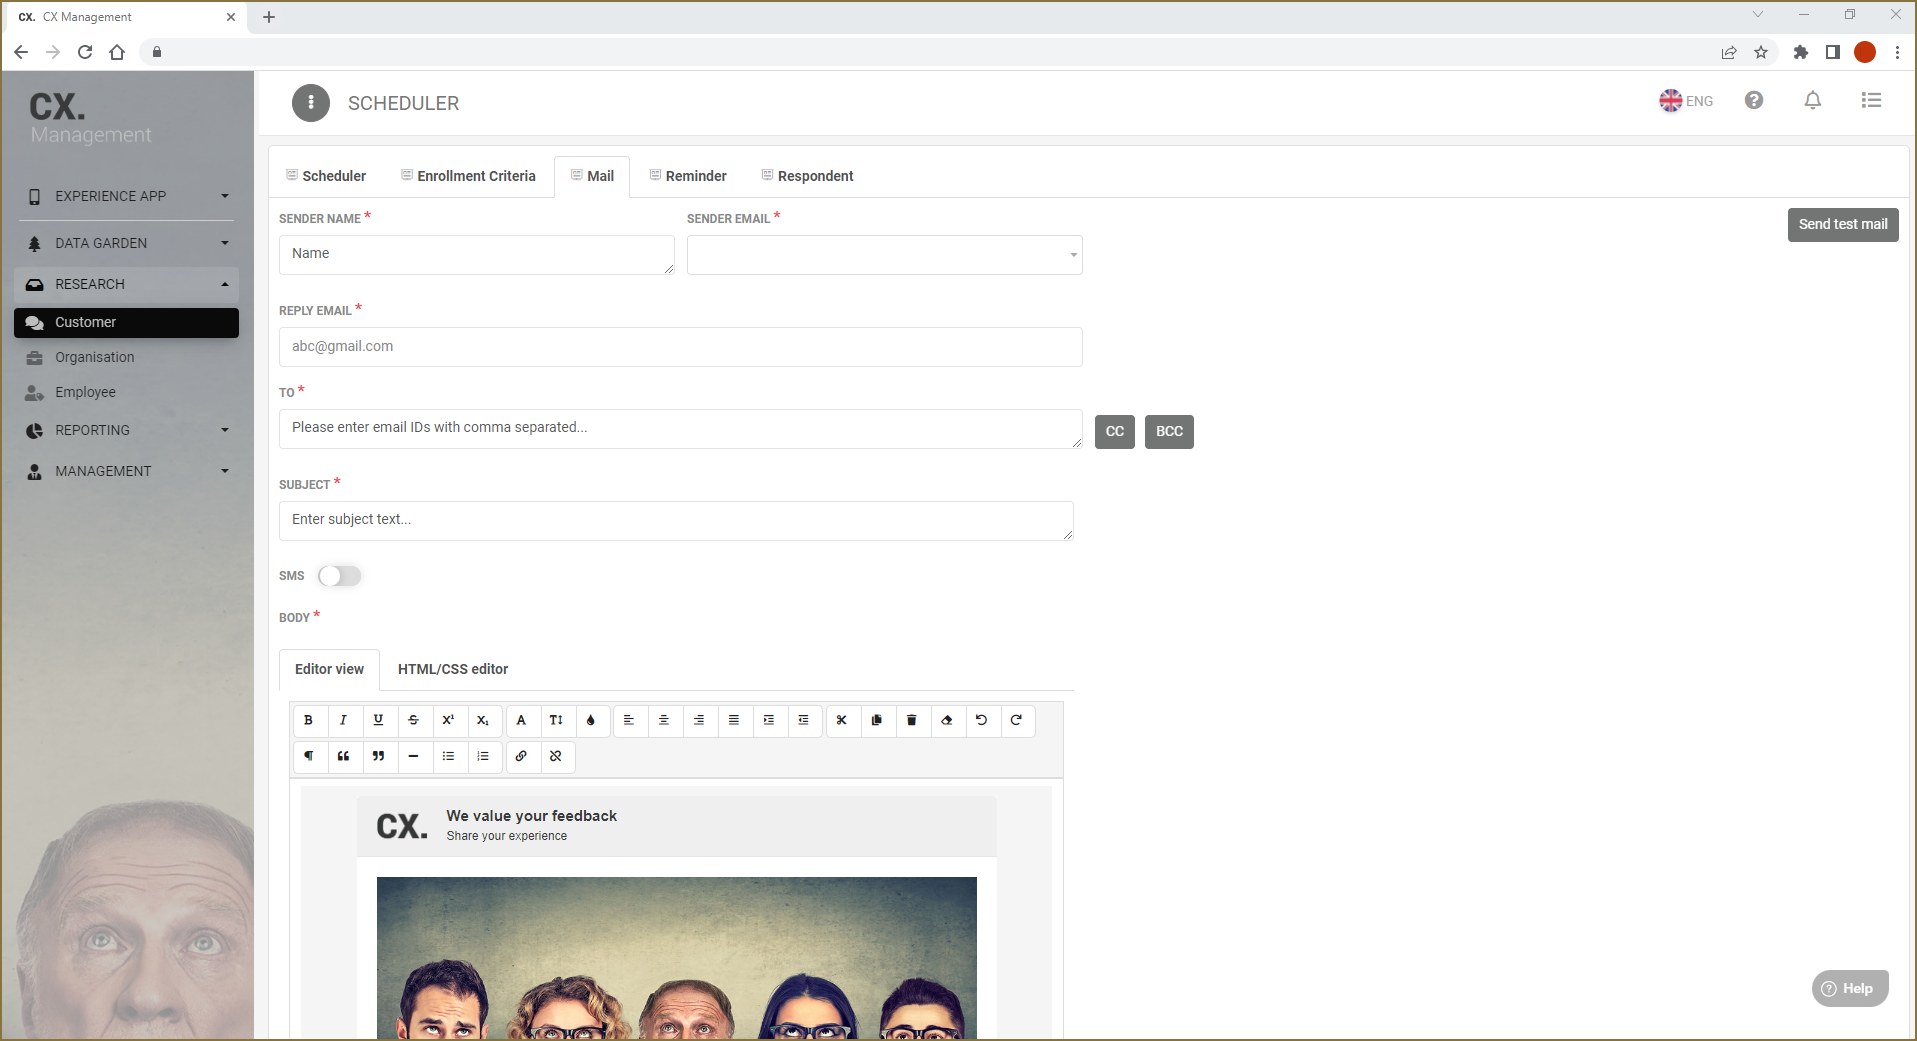
Table of contents:
General
When you add a collect feedback option, you can choose between several scheduler setups. Depending on how you want to collect your data, select the one that best suits your needs.
In a lot of cases, you will want to send a personal invitation to your respondents. If you select this option, by default, a basic invite template will be presented to you.
NOTE: For more information on the setup of personal invitation, please read the Personal invitation setup article.
To generate a high response, you want your invitation email to look nicely styled and personal. The email can be further styled using the html/css editor to match your company branding and give it a professional quality look and feel. CYS provides you with several additional templates which you can modify to your liking.
NOTE: To download the basic templates, please check the Templates for email invites article.
HTML template structure
After you have downloaded the template(s) to your computer you can preview it by opening it in a web browser, simply double-click it.
Open the template file in a text editor like Notepad to edit the code. We recommend using Notepad++ to edit the code. Notepad++ displays text and source code in different colours, which makes using it to edit the template source code very easy. The screenshot below shows the same file opened in Notepad and in Notepad++.

NOTE: Notepad++ is a text and source code editor for use with Microsoft Windows. It is distributed as free software and can be found here: https://notepad-plus-plus.org/
The structure of each template is basically the same. For easy editing we have split up the HTML template into multiple blocks of code. If you have opened the template file in Notepad++ you can recognize them easily by the green block descriptions:

The blocks are nested in html code. We recommend you only modify the code inside the blocks.
Since some email clients strip out embedded styles or linked, external stylesheets, we use inline CSS to ensure that the email displays well in the widest range of email clients. The inline CSS, or styling of an element is done in the html elements.
In the following chapters we will explain each individual part of the template code / blocks and give you some pointers on how to modify it to your liking.
NOTE: For more information about html and CSS, please use the W3Schools website: https://www.w3schools.com/html/default.asp
When you send a html styled mail some email clients, like Outlook, will show html code in the mail header of the message.
To make this look nice, we have added three lines of html code to the template in which you can add your preferred mail header text.


Header
The first block is the header block, and the code looks like this:

The header is made up out of a table with three rows, with the middle row split into two columns. The top and bottom rows are used to create some padding for the content we have placed in the middle row.
The first column in the middle row contains a logo image. You can replace the template logo with your own logo. Be sure to upload your image to the public folder of your Media Library. In the template we have hard coded the height and width of our logo to 50 (pixels). We recommend keeping the height of your logo at 50 (pixels). Based on the way your logo is designed, the width can be changed accordingly.
You can also remove the text width="50" from your code and only change the height value. The aspect ratio of your logo will remain the same.
We recommend using the PNG format for your logo. For the best results, you need to make the dimensions of your logo double of that what you want to present to your recipients. If the height of the logo in your template set to 50 pixels, then the image file itself needs to have a height of 100 pixels.
NOTE: For more information on the recommended file sizes and formats, please read the knowledge base article: Recommended file sizes.
The second column contains two lines of text. Because each line of text is nested in a div (<div>…</div>), the rules are placed one below the other. Note the styling added to the individual div’s. You can change them to your liking. It’s best to keep both lines short and to the point.
Image
The second block is the image block, and the code looks like this:

The image block consists of a table with a single row and a single column.
You can replace the header with an image which is more in line with your corporate identity. The standard image used in the template has a width of a 1000 pixels and a height of 310 pixels. In the html code we have coded that the image has a width of 600 pixels. This means that the image will be scaled down to a width of 600 pixels. You header image needs to be uploaded to public folder of your Media Library.
NOTE: For more information on how to add your own images to a html template, please read the knowledge base article: How to replace a picture within a HTML page?.
We recommend using the JPG format for the header image.
Text(s)
The third block is a text block, and the code looks like this:
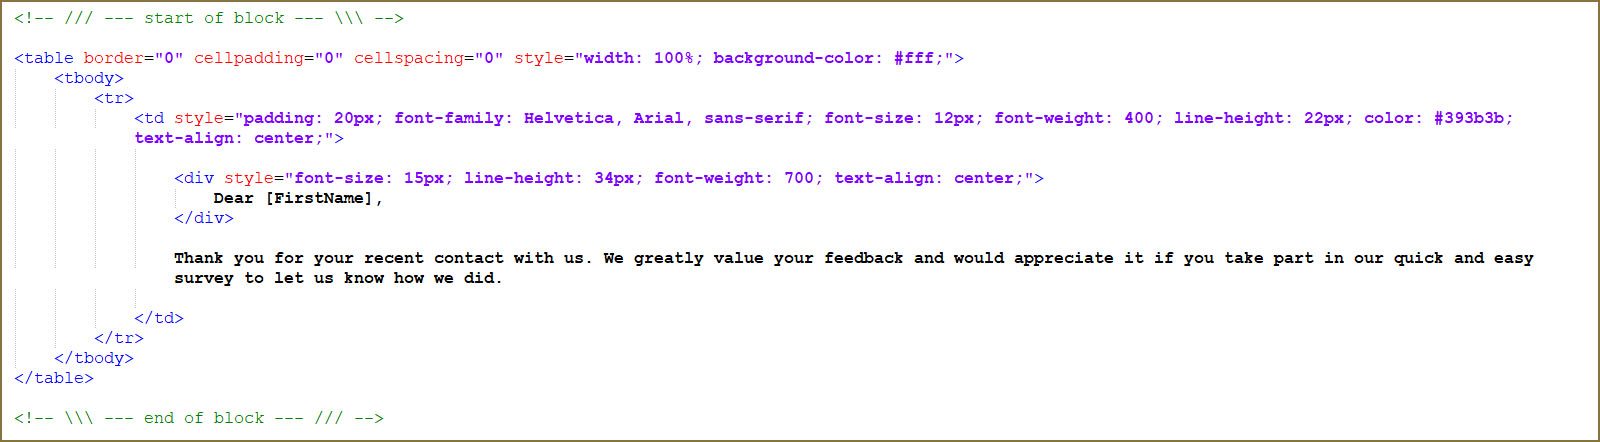
The content block consists of a table with a single row and a single column. The basic styling of the text is done in column (<td style=” … ”> … </td>). We have nested the salutation in a separate div so we can style the text separate from the rest of the text.
Button
The fourth block in the template file is the button block, and the code looks like this:
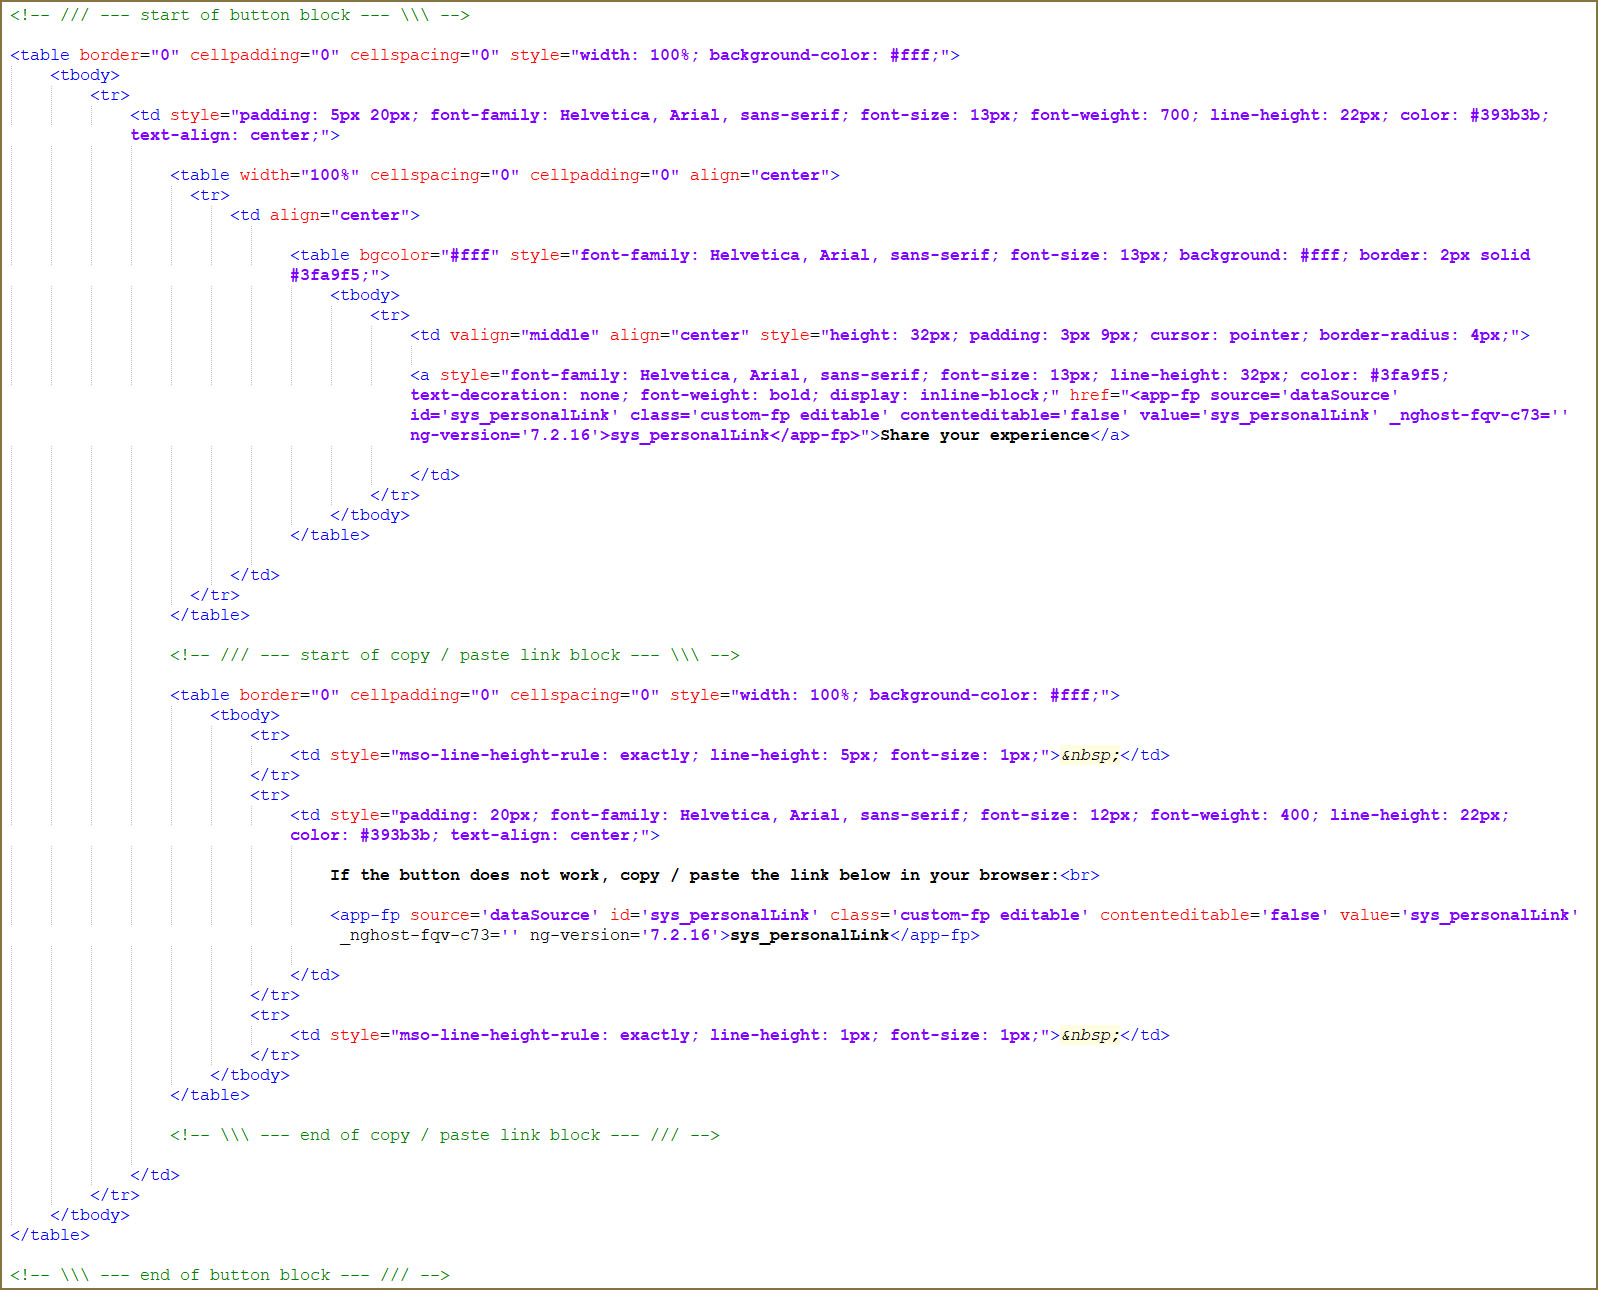
The button block consists of a table with a single row and a single column. Within this table we have added another table in a table. We use the first table to center the nested table which contains the actual button code with a hyperlink to the questionnaire.
In the styling of button table you see the code:
background: #fff; border: 2px solid #3fa9f5;
This gives the button a blue 2 pixel border and a white background.
In the styling of the button (text) itself we give the text of the button the same (hexadecimal) color code:
line-height: 32px; color: #3fa9f5; text-decoration: none; font-weight: bold; display: inline-block;
With the rest of the styling code indicate that for instance the text should be bold and not underlined. Check out the W3Schools website, noted above, for more information.
Text link
The button block contains a nested text link block. The code looks like this:

This block contains a line of text and an universal link to the questionnaire.
This block can be easily removed by selecting and deleting it.
Text
The fifth block is second text block, and the code looks like this:

Footer
The sixth and final block in the template, is the footer block, and the code looks like this:

The footer is made up out of a table with three rows, with the middle row split into two columns. The top and bottom rows are used to create some padding for the content we have placed in the middle row.
The first column in the middle row contains several links. The first link is to a privacy statement. You need to update the link to open on the privacy statement located on your own website.
The second link, links to a disclaimer page on our website. You can update the link to open on the disclaimer text of your own website or leave it as is.
The third link, links to an option for the respondent to unsubscribe from receiving any further invites.
In the second column you have the option to add a footer logo, but you can also leave it empty.